I recently completed (I think) the base for the Pirates figures. I may add a few more things to this in the future, but for now, Im sick of looking at it! lol so I have to put it to rest for now, so I can start working on a base for something else. Have to keep it fresh! I hope you like these bases I am making, and if you have any comments on them, please feel free to post them, I enjoy hearing the feedback. Thanks and happy holidays! This image is the center of the base. Just starting the building process. I was going to do it a solid chunk of wood, but I had a bunch of scrap wood laying around, so I figured I would just use it, since it would be covered with the boat siding anyway.

This image is of the building process. The sculpting of the mermaid and anchor for the ship, the rails for the boat, the assembly, and the finished product.

This image is 2 different views of the boat with the figures on, and one image with them removed. I was going for the look of just the front of a ship, and I am not sure if I got that across, or if it just looks like a small tugboat! lol.

and the final image is just a few different views, and then one of me holding it, for scale purposes. I hope you all enjoy this, and I will update this post when I finish up the next base I am working on.

Update: 12-29-13 Completed my newest base…….. Wreck it Ralph. Obviously I had to go with a classic 8 bit style for this base. But I couldn't leave poor Vanellope out, so I built her a candy stripe tree. The base is mostly made out of pearler beads, and sculpey clay. The pictures I will post show a pretty good walkthrough of how I made this base. If you have any questions, don't be afraid to ask. If I was ever going to duplicate a base I made so far if people were interested in buying, this one would be the one I would prefer to do, because it would be fairly easy to ship unassembled, and have the end user put it together like a model. anyway, on with the pictures.
Photo 1: the completed base with Ralph and Vanellope in their slots.

Photo 2: The completed base, with figures removed to show the slot I made for them.

photo 3: the 3 side views of the base….Didnt bother taking a photo of the back, because it looks just like the front of the building.

Photo 4: Just a view from a bit underneath the competed base.

Photo 5: creation and assembly photos: I started to design the building on my graph board, with my beads…this took a while because I wanted to make sure all the things were placed correctly.

Photo 6: I needed a tree for Ralph, and some potted shrubs for in front of the building

Photo 7: after I finished the beads, I melted them, so I could remove them from the peg board, and start assembling the pieces together.

Photo 8: The candy tree. This was a bit tough, but I got my sculpey clay, and made all my branches and ran a wire in each one, so I could then glue them to the trunk I made.

Photo 9: i designed a random pattern ground for them to stand on, and got all my pieces together, and ready to assemble.

Photo 10: some assemble photos, and final base

Photo 11: Me holding the base, for scale…The final product, and all 3 bases I designed and built so far.

I hope you all enjoy these, and if you have any questions, or comments, please feel free to hit me up! p.s. sorry for all the photos including the @pumpkinking27 on them, but I use the photos for my instagram, so I put that on there. Thanks again….and now, Onto the next base!!
Update: 1-7-14 I started and finished this base over the weekend, but didn't get a chance to take photos and upload them, so I will just toss up a couple of the finished piece right now, and when I get some more time, I will post some of the creation photos. So I decided I wanted to work on a base for Frozen. My original design was going to be some sort of ice sculpture castle, but realized that will be a little more difficult to pull off, and to look clean, and quite frankly, I didn't have the time to come up with something that would have to be so elaborate. Then I decided to take it a different route. You will have to have seen the movie to maybe understand what I was going for with this base. You may not know the character I decided to make the base out of. But if you have seen the film, then you should know this guy. I know I will probably not get as much praise for this piece as some of my other ones, because of the obscurity of the character I chose, but it is just the way I wanted to go with this base. Also, I want to add, I made the Olaf figure you see in the photos, but I didn't make him permanent, because I don't think I like the way he turned out. If I do decide to keep him, I will fix him somewhere running away from the base. well, that is all I have for now. I hope you enjoy, and as always, feel free to comment or ask any questions you have.
Photo 1: The complete base, with figures in their slots.

Photo 2: complete base, with figures removed from their slots.

Next few photos, just different angle shots of the completed piece.


I will update and post photos of the build process for those interested at a later time.
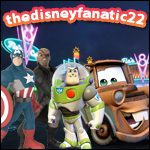
Update 1-11-14 I completed my next base today. This one was a 1 day start to finish build, and I am fairly happy with the way it turned out. Toy Story is one of my favorite movies of all time, so I wanted to make this with a classic feel. Trust me, in my original plan, I had so many characters in the toy box, but when it came down to the end, there just was not enough space for ALL the people I wanted to include, so I had to settle for decals on the back…..because hey, I had to at least represent all the classics. so, with that, I give you, my Toy Story custom base.
Photo 1: completed base with figures in slots.

Photo 2: completed base with figures removed.

Photo set 3: Left side, right side, and front, with lid closed almost all the way

Photo set 4: Birds eye view, and all sides view.

Photo set 5: Some of the building process photos. assembly, paint, and final piece.

Photo set 6: collage of the completed piece

as usual, any comments are welcome, and any questions you may have are more than welcome also. Hope you enjoy. I think I will be taking a little break from making bases for a little bit, UNLESS I get hit by some major inspiration. lol.